
How to Remove Candle Wax from Fabric
We’ve all been there—that heart-stopping moment when a lit candle drips onto your favourite shirt or tablecloth. It looks like a disaster, but trust me, it's a completely fixable situation. The key is to first let the wax cool down and harden completely. From there, you'll scrape off the excess, and then use a warm iron and something absorbent (like a paper towel) to lift the rest right out of the fibres.
Your First Moves When Wax Spills
When you see that fresh spill, your gut reaction is probably to grab a cloth and start rubbing. Stop right there. That’s actually the worst thing you can do.
Smearing hot wax only grinds it deeper into the fabric's weave. This turns a small, manageable spot into a much bigger, more stubborn stain. Your first and most important move is simply to step back and wait.
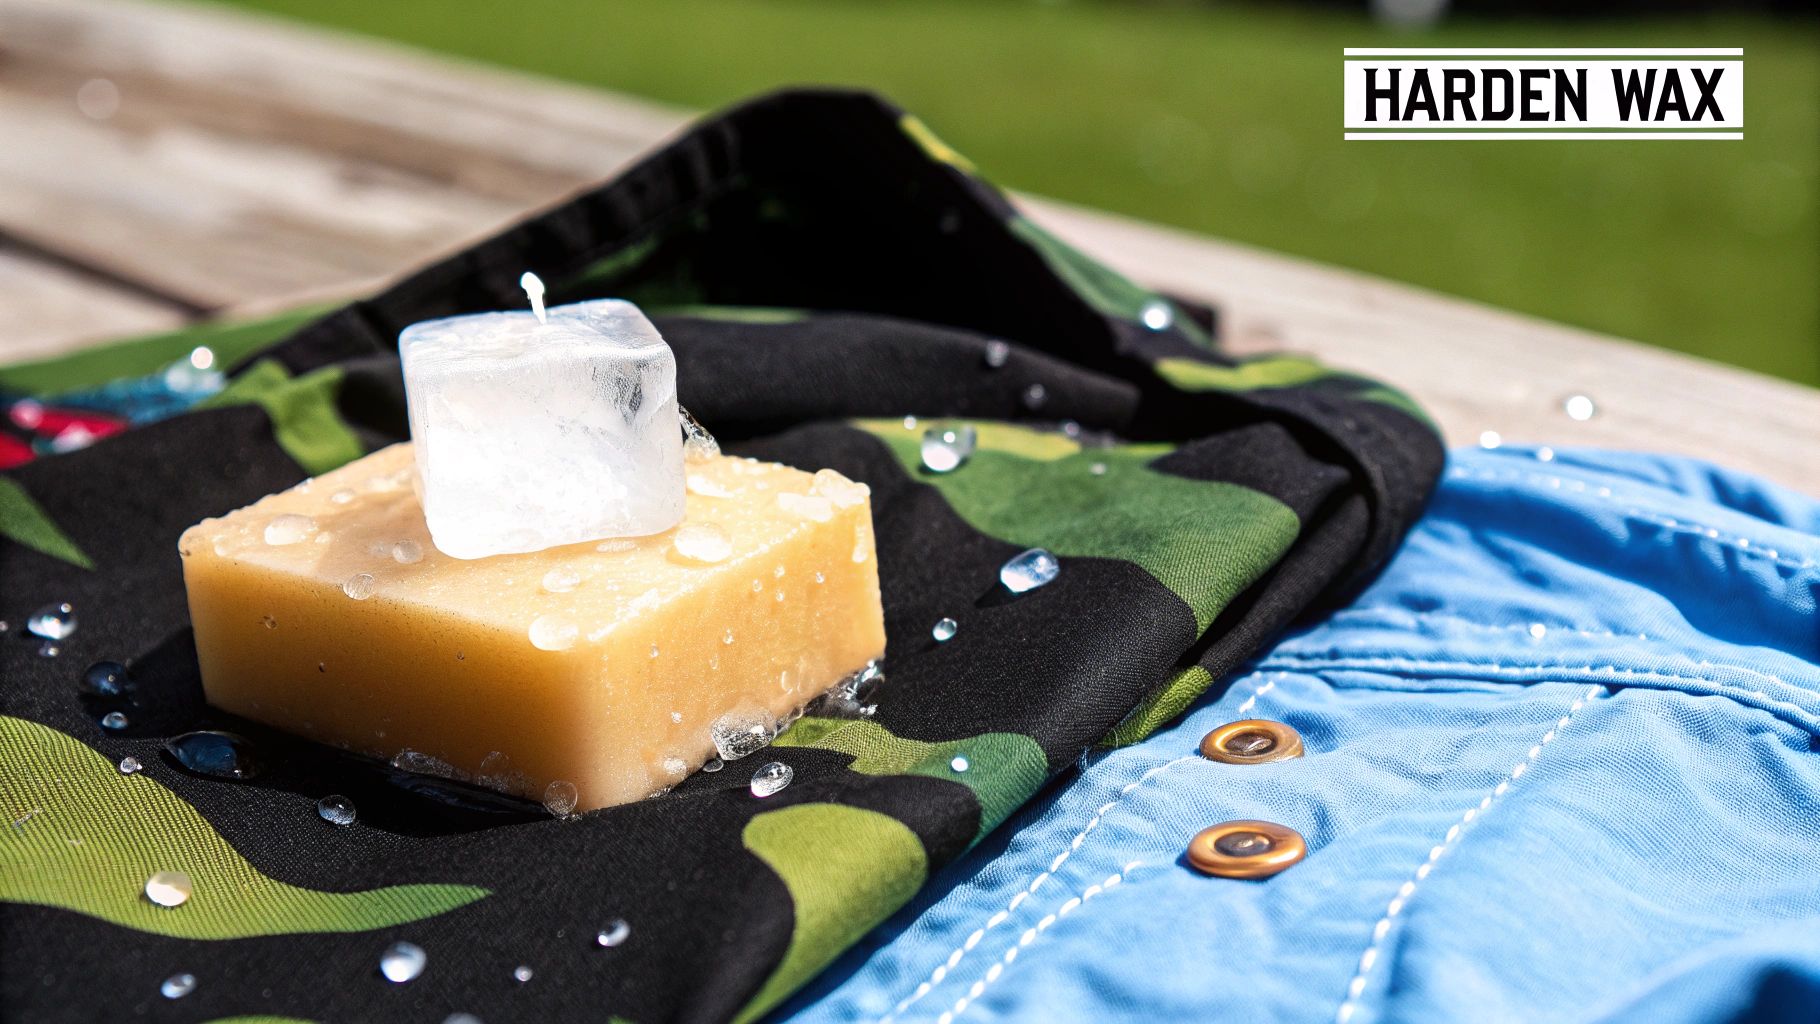
Let It Harden
Patience is truly your best friend here. You need to let the wax cool and become completely solid. This changes it from a liquid that soaks in, to a solid piece you can just lift off.
Pro Tip: Need to speed things up? Grab an ice cube from the freezer and hold it directly on the wax. The cold makes the wax brittle and helps it harden much faster, making it even easier to chip away without a fuss.
Before you start, it helps to have your supplies ready.
Essential Tools for Candle Wax Removal
Gather these common household items before you begin the wax removal process.
| Tool | Primary Use | Where to Find |
|---|---|---|
| Dull Knife or Credit Card | Gently scraping off hardened wax | Kitchen drawer, wallet |
| Paper Towels or Brown Paper Bag | Absorbing the melted wax residue | Kitchen pantry |
| Iron | Melting the remaining wax so it can be absorbed | Laundry room or closet |
| Ice Cubes | Speeding up the hardening process | Freezer |
| Stain Remover | Treating any lingering colour or oily residue | Laundry supplies |
Once you have your tools, you can move on to the next step.
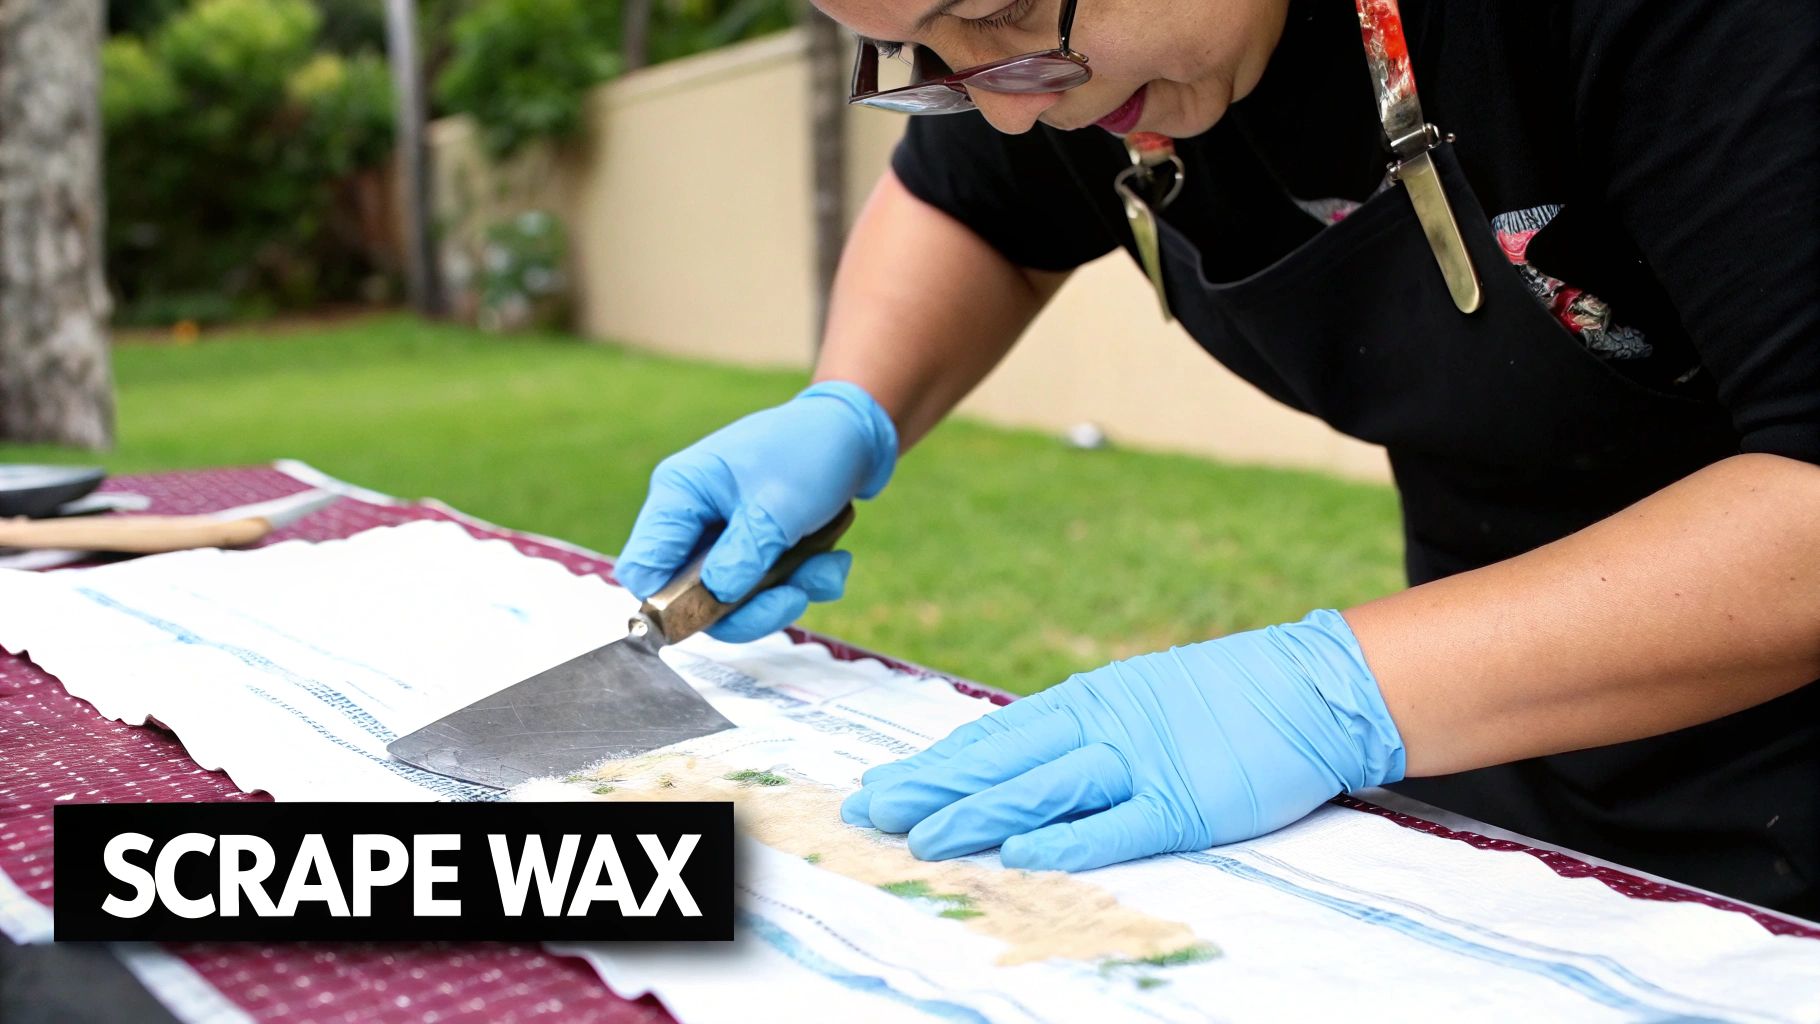
Scrape Away the Excess
After the wax is solid, it's time to get rid of as much as you can. Grab something that won't snag the fabric—a dull butter knife, the edge of a credit card, or even a spoon works great.
The goal is to gently pry the solid chunks of wax off the surface. Be careful not to scrape too hard, as you don't want to damage the delicate fibres underneath.
Taking the time to do this initial step properly is so important. In a place like California, where an estimated 67% of households use candles regularly, knowing these simple tricks can save a lot of clothing and linens from the bin. Letting the wax harden first is the secret to avoiding a permanent stain.
If you want a more detailed breakdown of different methods, you can find a great guide on how to get candle wax out of clothes. Nailing this first stage is what sets you up for success, whether you're working on a simple cotton tee or your best tablecloth.
Using an Iron on Everyday Fabrics
When candle wax ends up on sturdy fabrics like cotton, linen, or even denim, the old-school iron method is your best bet. I’ve used this trick more times than I can count, and it’s remarkably effective. The basic idea is simple: you’re using controlled heat to melt the wax and giving it something absorbent to soak into, lifting it right out of the fabric’s fibres.
It’s no surprise this technique is a go-to for so many people. A while back, home cleaning experts in California found that 72% of residents they surveyed were using a freeze-scrape-iron combo by 2018, which was a huge jump from only 34% in 2000. It just goes to show how effective this simple, at-home approach really is. If you're interested in more cleaning hacks like this, you can find some great advice on the Hotel Collection's blog.
Getting Your Fabric and Iron Ready
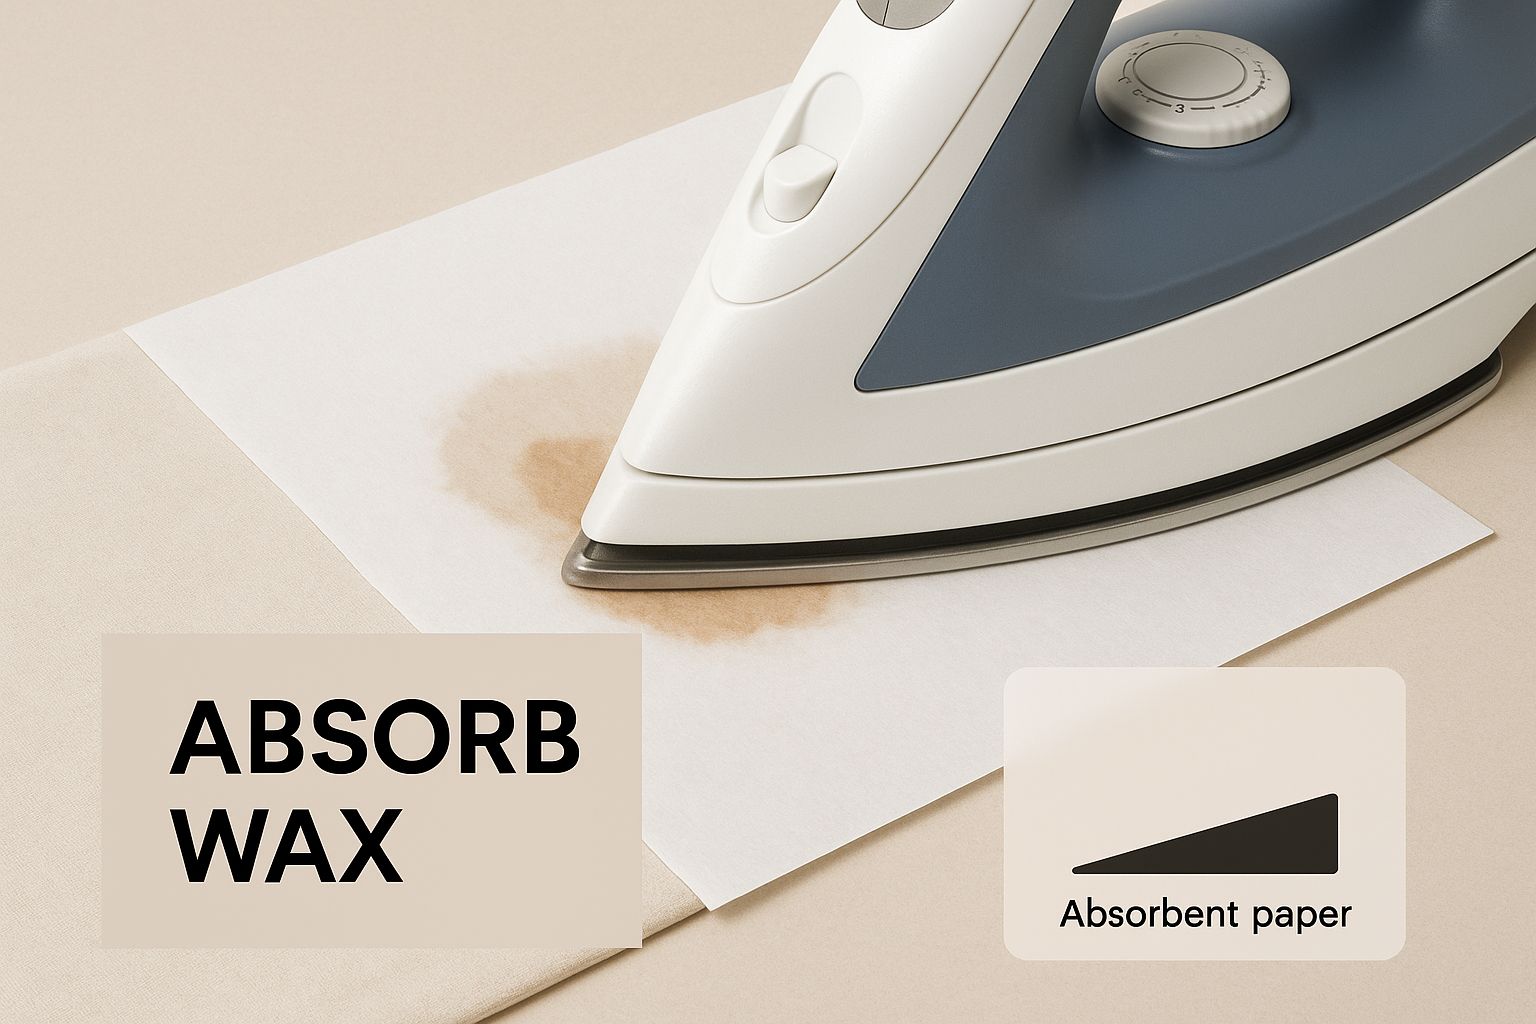
First things first, lay the stained garment flat on your ironing board. You’re going to create a "sandwich" with the wax stain in the middle. Place a couple of sheets of paper towel or a plain brown paper bag both underneath the stain and on top of it.
Now, grab your iron. Set it to a low-to-medium heat—you don't want it scorching hot. And this is critical: make sure the steam function is switched off. You need dry heat for this to work. Steam adds moisture, which will only get in the way and could even set the oily residue that the wax can leave behind.
A Quick Word of Caution: Always give the fabric's care label a quick check. If it says "do not iron," you'll need to try a different removal method. It’s also a good idea to test the iron on a hidden spot first, like an inside seam, just to be sure it won’t damage or discolour the material.
The Gentle Pressing Technique
With your setup ready, gently place the warm iron on the top layer of paper for just a few seconds. Don't press hard or move it around. You'll quickly see an oily spot appear on the paper as it starts absorbing the melted wax.
Lift the iron, move the paper towel to a clean, fresh section, and press again. You’ll need to keep repeating this—press, lift, and shift to a clean spot—until the paper stops pulling out any more wax.
- Don't Rush It: It might be tempting to crank up the heat to speed things up, but please don't. An iron that’s too hot can scorch the fabric or, worse, permanently set the oily part of the stain.
- Keep It Fresh: Always use a clean part of the paper towel or bag for each press. Once a section is saturated, it can’t absorb any more wax and might just transfer it back onto the garment.
It’s a methodical process, but it works like a charm. With a little patience, you can draw the wax right out and get your clothes looking good as new, all without reaching for harsh chemicals.
Dealing with Coloured Candle Wax Stains
You've done the hard part—you scraped and ironed away the wax itself. But now you're left with a colourful shadow, a ghost of the candle that was. This is a common headache, especially with vibrant reds and deep blues, which can leave a stubborn dye stain long after the wax is gone.
This happens because the dye in the wax is often oil-based, allowing it to really grab onto fabric fibres.
Tackling this colourful residue needs a completely different strategy. The absolute key is to treat that oily, pigmented stain before the item even thinks about going into the washing machine. If you toss it in the wash too soon, the heat can set that oily dye permanently. Trust me, it’s much harder to get out at that point.
Treating the Pigment Stain
Before you launder the item, you need to pre-treat the stained spot. A good quality liquid laundry detergent or a dedicated stain remover is a great place to start. Just work a small amount into the stain with your fingers and let it sit for about 15-20 minutes. This gives it time to start breaking down the oily pigment.
For a little more power, rubbing alcohol can be your best friend.
- Always test first: Find a hidden spot, like an inside seam, and dab a little alcohol on to make sure it doesn't lift the fabric's original colour.
- Blot, don't rub: Use a clean, white cloth dampened with the alcohol and gently blot the stain. You'll start to see the dye transfer from your fabric to the cloth.
- Rinse it out: Once you’ve blotted out as much colour as you can, give the area a good rinse with cool water before washing.
Even after you get the wax off, a colourful candle can leave its mark. For more general advice on tackling tough spots, you can find great tips on how to effectively remove stubborn carpet stains.
More advanced techniques might call for solvent-based cleaning fluids designed to dissolve the dye. You can find more in-depth cleaning advice on Good Housekeeping's website that explores some of these methods.
Remember, the goal here is to dissolve the dye and oil, not just scrub it deeper into the fabric. How you treat the stain at this stage is the most important step in saving your item from permanent discolouration. Sometimes, choosing candles made from cleaner-burning waxes can make cleanup easier; you can read more about the https://shivoracandles.com/blogs/news/soy-wax-candles-benefits on our blog.
Special Care for Delicate Fabrics and Upholstery
It's one thing to get a wax drip on a sturdy cotton tablecloth, but a whole different story when it lands on your favourite silk blouse or those new velvet cushions. Panic can set in fast. But don't worry, even the most precious fabrics can usually be saved with a bit of patience and the right technique.
These situations call for a much gentler touch. A hot iron, our usual go-to, can easily scorch or permanently damage sensitive materials. We need a different plan.
A Softer Touch for Silk and Satin
With fabrics like silk and satin, you have to avoid high, direct heat at all costs. The idea here is just to soften the wax enough to blot it up, not to melt it completely back into a liquid state.
First, let the wax harden completely, then gently flake off as much of the surface wax as you can with the edge of a credit card or a dull knife.
Now, grab your hairdryer and switch it to the lowest heat and speed setting. Holding it a good few inches away from the fabric, gently warm the waxy area. As soon as you see it start to soften, press a clean paper towel onto the spot. You'll see the wax absorb right into the paper. Keep using fresh sections of the paper towel and repeat the process until the wax is gone. It’s a slow, careful method, but it protects those delicate fibres.
The image above really shows the core principle at work: using heat to loosen the wax so an absorbent material can pull it out. We're just swapping the iron for the much gentler heat of a hairdryer.
Dealing with Upholstery and Velvet
You can’t exactly throw your sofa in the washing machine, which makes upholstery a unique challenge. After you've carefully scraped away the hardened wax, you’ll likely be left with a greasy-looking mark.
To tackle this, a bit of upholstery cleaner or even a simple mix of clear dish soap and water on a clean cloth often does the trick. The key is to blot, never scrub, as rubbing can push the stain deeper or damage the fabric. For a more detailed walkthrough, this is a great resource for easy candle wax removal from your sofa.
With velvet, there’s one final, crucial step to bring it back to life. Once the wax is gone and the spot is completely dry, take a soft-bristled brush and gently brush the pile back into its original direction. This simple trick restores that beautiful, uniform, and luxurious finish.
Choosing your candles wisely can also make future clean-ups much easier. Spills from certain types of wax are far less of a headache. You can learn more about [https://shivoracandles.com/blogs/news/why-soy-wax-candles-are-the-smarter-cleaner-choice].
Wax Removal Method by Fabric Type
Not all fabrics are created equal, and the method that works for one could spell disaster for another. Here’s a quick-reference table to help you choose the safest and most effective approach based on the material you're working with.
| Fabric Type | Recommended Heat Level | Best Treatment Method | Key Precaution |
|---|---|---|---|
| Cotton/Linen | Medium-High | Iron & paper towel method | Ensure iron isn't set too high to avoid scorching. |
| Synthetics | Low-Medium | Iron & paper towel method (low heat) | Synthetics can melt; start with the lowest iron setting. |
| Silk/Satin | Very Low | Hairdryer & paper towel method | Never apply direct heat from an iron. |
| Velvet | Very Low / Indirect | Hairdryer & blotting / Spot cleaning | Brush the pile afterward to restore texture. |
| Upholstery | None to Very Low | Scraping & spot cleaning | Always test any cleaning solution on an inconspicuous area first. |
This table serves as a solid starting point, but always remember to consider the specific care label on your item. When in doubt, start with the most gentle method first—you can always increase the intensity, but you can't undo damage from too much heat.
The Final Wash and Inspection
You've scraped, heated, and spot-treated the wax stain. Now comes the final, make-or-break step: washing away any last traces of that waxy, oily residue. How you handle this last part will determine if that tablecloth or favourite sweater is truly saved.
Toss the item in the wash, using the hottest water the fabric's care label allows. The heat is your best friend here, as it will help dissolve and wash away any oily remnants still clinging to the fibres.
The Golden Rule of Wax Removal
Now for the most critical piece of advice I can give you: do not put the item in the dryer. Seriously. The intense heat from a machine dryer will act just like a hot iron, permanently setting any faint, greasy spot you might have missed.
Once a wax or oil stain gets baked in by a dryer, it's incredibly difficult, and often impossible, to get out. Always air-dry until you're 100% certain the stain has vanished.
Let the fabric air dry completely, ideally somewhere with good natural light so you can get a clear look at it. Once it's dry, hold it up and inspect the spot from every angle. Sometimes a faint, shadowy stain is only visible when the light hits it just right.
If you spot even a hint of discolouration, don't worry. Just repeat the stain treatment and washing process. A little patience at this stage is what makes all the difference.
Getting your fabrics clean is one thing, but keeping your candles burning well is another. Waxy buildup can cause all sorts of problems, which you can learn more about in our guide on how to fix an unevenly burning candle. Only once the fabric looks perfect should you call it a job well done.
Common Questions About Removing Candle Wax
Even with the best techniques, you're bound to run into a few tricky situations. Let's walk through some of the common questions that pop up when you're trying to get candle wax out of fabric.
What About Delicate Fabrics Like Silk?
This is a big one. What happens when wax lands on something that can't take the heat from an iron, like silk or lace? You're right to be cautious—a hot iron would be a disaster on these materials.
For sensitive fabrics, you have to be much gentler. While cleaning professionals in California have found the standard iron-and-paper-towel method works over 85% of the time on tough fabrics like cotton, that's not the case here. For delicates, the best approach is to freeze the wax first, gently flake off what you can, and then treat any remaining residue with a mild solvent before washing. For a deeper dive into cleaning various surfaces, The Maids blog has some excellent insights.
What If a Greasy Stain Remains?
It’s frustrating, but sometimes after you’ve removed all the solid wax, you’re left with a faint, oily shadow. This is completely normal, as most candle waxes contain oils that can seep into the fibres.
Don't worry, that greasy spot isn't permanent yet. Just pre-treat it with a bit of clear dish soap or your go-to stain remover. Work it into the fabric and let it sit for about 15 minutes to really break down the oils. After that, you can launder the item as you normally would.
Key Takeaway: Whatever you do, don't throw the fabric in a machine dryer until the oily residue is completely gone. The high heat from a dryer will set that stain for good, making it nearly impossible to remove.
Of course, the best way to deal with a wax spill is to prevent it from happening in the first place. You can find some fantastic advice on how to enjoy your candles safely and keep messes to a minimum in our guide to the top candle safety tips.